
How to Set Up n8n Webhooks Locally on Windows 11/10 (WSL + Homebrew + ngrok)
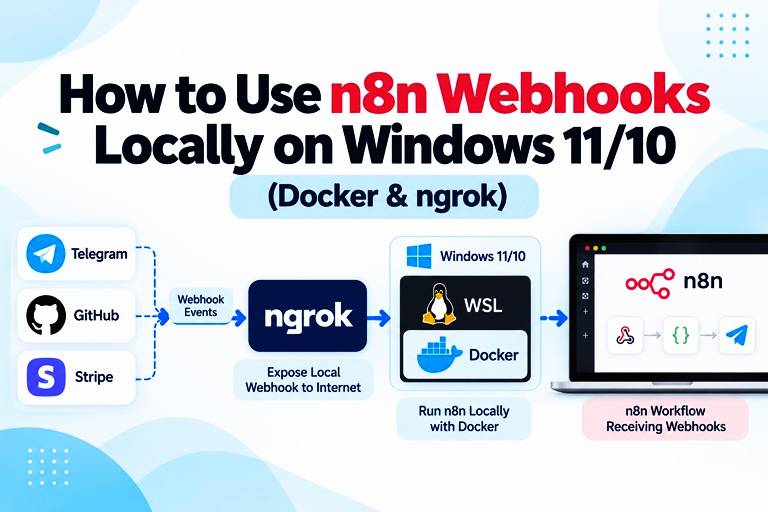 You installed n8n on your Windows laptop. It runs fine. Then you try to connect a webhook to Telegram, GitHub, or Stripe, and nothing arrives. The service says it cannot reach your localhost:5678.
I hit the same problem. My laptop has no public address on the internet, so outside services have no way to find it. The easiest fix is a tunnel. A tunnel gives your local n8n a safe public web address. We will build one with a free tool called ngrok, running inside WSL on Windows.
I run n8n with Docker Desktop on Windows 11, and this setup works well for me. Many people instead run n8n directly inside WSL. This guide covers both, so you can follow the path that matches your setup. I will also point out the mistakes I made so you can skip them.
To use n8n webhooks locally on Windows, run ngrok to create a public HTTPS tunnel to port 5678, then set n8n’s WEBHOOK_URL variable to that ngrok address. Restart n8n so it generates public webhook URLs instead of localhost ones. Outside services like Telegram, GitHub, and Stripe can then reach your workflow.
Which Setup Do You Have?
You can set up n8n in two common ways on Windows. The tunnel steps are almost the same for both. Only the step where you tell n8n its public address is different.
| Setup A: Docker Desktop | Setup B: n8n inside WSL | |
|---|---|---|
| How n8n runs | In a Docker container | Directly in the Ubuntu terminal |
| Where ngrok runs | Inside WSL | Inside WSL |
| How you give n8n its public address | With -e settings or Docker Desktop’s environment variables box | With export commands in the terminal |
| How you restart n8n | Restart or recreate the container | Run n8n start again |
Not sure which one you have? If you open Docker Desktop and see a container named n8n, you are on Setup A. If you start n8n by typing n8n start in an Ubuntu terminal, you are on Setup B.
One warning: if you run n8n installed directly on Windows (not in Docker and not in WSL), ngrok inside WSL may not be able to reach it. In that case, install ngrok on Windows instead, or move n8n into Docker or WSL.
Three Ideas You Need First
Read these three short sections before you type any command. The rest of the guide will make much more sense.
What Is an n8n Webhook?
n8n is a tool that automates tasks. Think of it like digital LEGO. Each block (called a node) does one small job, and you snap blocks together to build an automation.
A webhook is a special starting block. Most triggers work by asking again and again, “Is there anything new?” A webhook works the other way around. It waits quietly, and an outside service sends data to it the moment something happens.
n8n gives every Webhook node two web addresses (URLs):
- Test URL: use this while you build. After you click “Listen for test event,” it works for only 120 seconds. The data it receives shows up right in the editor, which makes fixing mistakes easy.
- Production URL: use this after you publish the workflow. It does not show data in the editor, but you can see every run in the Executions tab.
Here is the problem. By default, both URLs start with http://localhost:5678/webhook/…. The word localhost means “this computer, right here.” When Telegram, GitHub, or Stripe sees localhost, it thinks you mean its own server, not your laptop.
So outside services can never reach your webhook. That is why we need a tunnel.
What Is WSL?
WSL stands for Windows Subsystem for Linux. It lets you run a real Linux system inside Windows. You do not need a virtual machine or a second operating system.
Why use it? Setting up ngrok on Windows can be awkward. On Linux it takes just a few commands. WSL gives you a clean Linux terminal that works almost like a real server. It is also where Setup B runs n8n.
What Is Homebrew?
Homebrew is a package manager, many a time also known as ‘brew’. That is a tool that installs other tools for you. Instead of downloading files by hand and fixing settings, you type brew install tool-name.
ngrok itself cannot be installed with Homebrew on Linux (I will explain why later). But Homebrew is still worth setting up. Once it is ready, tools like jq, httpie, and gh become one-line installs.
Install WSL
If WSL with Ubuntu is already working on your laptop, skip to next section.
Install WSL2
- Press Windows + S and type PowerShell.
- Right-click it and choose Run as administrator.
- Type this command and press Enter:
wsl --install
This installs WSL2 and Linux/Ubuntu together. It takes about 5 to 10 minutes.
When it finishes, restart your computer. Ubuntu opens by itself after the restart and asks you to:
- Create a Linux username (for example, john)
- Create a password. You will not see any characters while typing. That is normal.
Update Linux/Ubuntu
Inside the Linux window, run:
sudo apt update && sudo apt upgrade -y
This refreshes the list of available software and updates what you already have.
Make Sure You Are in the Right Terminal
This is the first trap many beginners fall into.
To open WSL, search for Ubuntu in the Start menu. You can also open Windows Terminal and pick Ubuntu from the drop-down.
Your prompt should look like this:
username@LAPTOP-XXXX:~$
Notice it ends with ~$. If you see something like C:\Windows\System32>, you are in the wrong place. That is the Windows Command Prompt, and Linux commands will fail there.
Install Homebrew Inside WSL
Install the Required Tools
Homebrew needs a few basic tools first:
sudo apt-get install build-essential procps curl file git -y
Run the Homebrew Installer
/bin/bash -c "$(curl -fsSL https://raw.githubusercontent.com/Homebrew/install/HEAD/install.sh)"
Near the end you will see a warning like this:
Warning: /home/linuxbrew/.linuxbrew/bin is not in your PATH.
Do not worry. Homebrew installed correctly. Your system just does not know where to find it yet. The next step fixes that.
Add Homebrew to Your PATH
The PATH is the list of places your system looks when you type a command. Run these three commands one at a time.
Step#1: Save the Homebrew setup so it loads every time you open WSL.
echo 'eval "$(/home/linuxbrew/.linuxbrew/bin/brew shellenv bash)"' >> ~/.bashrc
Step 2: Apply it to the terminal you are using right now.
eval "$(/home/linuxbrew/.linuxbrew/bin/brew shellenv bash)"
Step 3: Check that it works.
brew --version
You should see something like Homebrew 4.x.x.
The Mistake I Made (So You Can Skip It)
The first time, I ran the echo … >> ~/.bashrc command in the Windows Command Prompt. It failed with this message:
The system cannot find the path specified.
The reason is simple. ~/.bashrc is a Linux file, and Windows does not understand the ~ symbol.
Remember this rule: any command that has ~, /home/, sudo, or apt must run inside the WSL terminal.
How to tell them apart:
- username@LAPTOP-XXXX:~$ means WSL (correct)
- C:\Users\…> means Windows (wrong for these commands)
Install ngrok
Why ‘brew install ngrok’ Fails
Most people try this first:
brew install ngrok
And they get this error:
Error: ngrok: This cask requires macOS.
Homebrew packages ngrok as a “cask.” Casks are only supported on macOS, not on Linux. So we will install the official Linux version of ngrok instead.
Download ngrok
wget https://bin.equinox.io/c/bNyj1mQVY4c/ngrok-v3-stable-linux-amd64.tgz
Unpack and Install It
sudo tar xvzf ./ngrok-v3-stable-linux-amd64.tgz -C /usr/local/bin
WSL will ask for your password. Type it and press Enter.
Check the Installation
ngrok version
You should see ngrok version 3.x.x.
Tip: if the download link above stops working one day, open the ngrok download page and copy the current Linux link from there. ngrok also offers an apt install method on that page, which is a good alternative.
Connect ngrok to Your Account
Get Your Authtoken
An authtoken is like a password that links ngrok on your laptop to your free ngrok account.
- Create a free account at ngrok.com.
- Open this page: https://dashboard.ngrok.com/get-started/your-authtoken
- Copy your authtoken.
Save the Token
Replace YOUR_AUTH_TOKEN with the token you copied:
ngrok config add-authtoken YOUR_AUTH_TOKEN
Test the Tunnel
Make sure n8n is running first (your Docker container, or n8n start in WSL). Then run this in your WSL terminal:
ngrok http 5678
Port 5678 is where n8n listens by default. ngrok will show something like this:
Forwarding https://abc123.ngrok-free.app -> http://localhost:5678
The address https://abc123.ngrok-free.app is your public URL. Anyone on the internet can now reach your local n8n through it.
Docker users: you might wonder how ngrok inside WSL can see a container running in Docker. When you start the container with -p 5678:5678, Docker publishes that port on your laptop. WSL can then reach it at localhost:5678. This worked for me on Windows 11. If ngrok shows a “connection refused” error, check that Docker Desktop is running and the container is started.
Press Ctrl + C to stop the tunnel for now.
Tell n8n to Use the ngrok Address
This is the most important chapter. Starting ngrok alone is not enough. By default, n8n still builds webhook URLs that start with localhost. You have to tell n8n, “Your public address is the one ngrok gave you.”
When n8n builds a webhook URL, it uses its own protocol, host name, and port. By default, all of these point to localhost. When an outside service receives a localhost address, it looks for the webhook on its own server, not on your laptop.
You give n8n its public address through settings called environment variables. These are settings a program reads when it starts. Here are the ones we need (use your own ngrok address):
| Variable | Value | What it does |
|---|---|---|
| WEBHOOK_URL | https://abc123.ngrok-free.app/ | The public address n8n uses for webhook links. The most important one. |
| N8N_HOST | abc123.ngrok-free.app | The host name, without https://. |
| N8N_PROTOCOL | https | Tells n8n to build secure links. |
| N8N_PROXY_HOPS | 1 | Tells n8n that a proxy (ngrok) sits in front of it. |
Two small rules: WEBHOOK_URL must end with a /, and N8N_HOST must not include https://
How you set them depends on your setup. Pick the one that matches yours.
Setup A: n8n Running in Docker Desktop
A Docker container does not read variables from your terminal. You must pass them to the container when it starts. There is one more catch: you cannot edit the variables of a container that already exists. You have to remove it and create it again with the new settings.
First, protect your data. Your workflows and passwords live inside the container unless you saved them in a volume or folder. Open Docker Desktop, click your n8n container, and look at the Volumes or Bind mounts tab. If you see a volume (for example n8n_data) mapped to /home/node/.n8n, your data is safe. Use the same volume again in the next step. If you see nothing there, do not delete the container yet. Export your workflows from n8n first.
Step#1: Stop and remove the old container:
In Docker Desktop, stop the n8n container and delete it. Or use these commands in PowerShell:
docker stop n8n
docker rm n8n
Step#2: Start a new container with your ngrok address:
Run this single command in PowerShell. Replace the ngrok address with your own:
docker run -d --name n8n -p 5678:5678 -v n8n_data:/home/node/.n8n -e WEBHOOK_URL="https://abc123.ngrok-free.app/" -e N8N_HOST="abc123.ngrok-free.app" -e N8N_PROTOCOL="https" -e N8N_PROXY_HOPS=1 --restart unless-stopped docker.n8n.io/n8nio/n8n
What the important parts mean:
- -d runs the container in the background.
- –name n8n gives it an easy name.
- -p 5678:5678 publishes the port so ngrok can reach it.
- -v n8n_data:/home/node/.n8n keeps your workflows and settings safe in a volume.
- Each -e sets one environment variable.
Prefer clicking over typing? You can do the same in Docker Desktop. Open Images, click Run on the n8n image, and expand Optional settings. Fill in the container name (n8n), the host port (5678), the volume (n8n_data mapped to /home/node/.n8n), and add each variable in the Environment variables section. The screen layout may look slightly different in newer Docker Desktop versions.
Step#3: Check that n8n received the settings:
Run this command:
docker exec n8n printenv WEBHOOK_URL
It should print your ngrok address. Now open a Webhook node in n8n and look at the Production URL. It should start with your ngrok address and not with localhost.
Setup B: n8n Running Inside WSL
Here n8n runs in the same Ubuntu terminal, so you set the variables with export before you start it. In the terminal where you will start n8n, type:
export WEBHOOK_URL="https://abc123.ngrok-free.app/"
export N8N_HOST="abc123.ngrok-free.app"
export N8N_PROTOCOL="https"
export N8N_PROXY_HOPS=1
Then start n8n:
n8n start
Open a Webhook node and look at the Production URL. It should now look like this:
https://abc123.ngrok-free.app/webhook/your-path
A better way: a start script. Typing these lines every time gets boring. Put them in a small script instead.
Create the file:
nano ~/start-n8n.sh
Paste this inside (use your own ngrok address):
#!/bin/bash
export WEBHOOK_URL="https://abc123.ngrok-free.app/"
export N8N_HOST="abc123.ngrok-free.app"
export N8N_PROTOCOL="https"
export N8N_PROXY_HOPS=1
n8n start
Save the file (press Ctrl + O, then Enter, then Ctrl + X). Then make it runnable:
chmod +x ~/start-n8n.sh
From now on, start n8n with one command:
~/start-n8n.sh
Try It Yourself to Use n8n Webhooks Locally
The Goal
We will do the simplest possible test. We will start an n8n workflow from the outside using one curl command.
Build a Test Workflow
- Open n8n in your browser at http://localhost:5678 and create a new workflow.
- Add a Webhook node as the trigger.
- Copy the Production URL from the node.
- Save and publish the workflow. The Production URL only works after you publish.
Make sure ngrok is still running in its own WSL terminal while you test.
Trigger It With curl
Open a new WSL terminal and run this. Replace the address with your own Production URL.
curl --request POST https://abc123.ngrok-free.app/webhook/your-path \
  -H "Content-Type: application/json" \
  -d '{"message": "Hello from the outside world!"}'
Check the Result
Go back to n8n and open the Executions tab of your workflow. You should see a new run that contains Hello from the outside world!.
That means your local n8n can now receive data from the public internet.
Tip for Building and Debugging
While you are still building, use the Test URL instead. It shows data right in the editor.
- Click Listen for test event in the Webhook node.
- Within 120 seconds, send your request to the Test URL.
- The data appears live in the editor.
Common Problems and Fixes on Using n8n Webhooks Locally
The ngrok URL Changes Every Time
Sometimes ngrok gives you a new random address each time you restart it. When that happens:
- You must update your n8n settings again (WEBHOOK_URL and N8N_HOST). For Docker, that means recreating the container.
- Any address you already gave to another service, such as Telegram’s BotFather, stops working.
Fix: use a fixed (static) domain. A free ngrok account includes one free domain. Open the Domains page in your ngrok dashboard to find it, then start the tunnel with it:
ngrok http --url=https://your-name.ngrok-free.app 5678
Your address now stays the same every time. If you read older guides, you may see –domain used here. ngrok has replaced it with –url.
“Page not found” or the Webhook Does Not Start
Check these three things:
- Is the workflow published? The Production URL only works after you save and publish.
- Is the address exactly right? The path and the HTTP method (such as POST) must match.
- Did you set WEBHOOK_URL? If not, n8n creates localhost addresses that outsiders cannot reach.
Docker: I Changed the Settings but Nothing Changed
This is the most common Docker problem. A running container keeps the settings it started with. Editing your command or notes does nothing until you remove the container and create it again (Chapter 6A). Also make sure you used WEBHOOK_URL. Some older guides mention WEBHOOK_TUNNEL_URL, which did not work for me.
Docker: “The Container Name Is Already in Use”
You will see this error if you run docker run –name n8n while an old container with that name still exists. Remove it first:
docker rm -f n8n
Your data is safe as long as you used a volume, because removing a container does not remove its volume.
Port 5678 Is Already in Use
If n8n or Docker says the port is busy, use another port.
For Docker, change the left number in -p (the left side is your laptop, the right side is the container):
docker run -d --name n8n -p 5679:5678 ...
For n8n inside WSL:
export N8N_PORT=5679
n8n start
In both cases, tell ngrok to use the new port:
ngrok http 5679
Keep ngrok and n8n Running
You need ngrok running in its own WSL terminal for as long as you want to receive webhooks. For Docker, n8n keeps running in the background by itself. For n8n inside WSL, use a second terminal, or tools like tmux, screen, or nohup.
Is This Setup Worth It?
You may wonder why you should do all this when n8n Cloud exists. It depends on what you need.
Reasons to run n8n locally with a tunnel:
- Your data stays with you. Workflows, passwords, and customer data never leave your computer.
- No execution limits. n8n Cloud charges by the number of runs. Self-hosting does not.
- You learn a lot. You will understand webhooks, tunnels, containers, and environment variables instead of relying on a black box.
- It is free. You only need your computer and an internet connection.
The trade-offs:
- Your computer must be on to receive webhooks.
- Your ngrok address may change unless you use a fixed domain.
- You must handle n8n updates and security yourself.
For learning, testing, and small personal automations, this is a great option. For important business workflows, consider n8n Cloud or a small rented server (VPS).
Quick Reference: All Commands in One Place
Common steps (both setups):
# ===== Install WSL (run in PowerShell as Administrator) =====
wsl --install

# ===== Everything below runs inside the WSL (Ubuntu) terminal =====

# Update Ubuntu
sudo apt update && sudo apt upgrade -y

# Install Homebrew requirements
sudo apt-get install build-essential procps curl file git -y

# Install Homebrew
/bin/bash -c "$(curl -fsSL https://raw.githubusercontent.com/Homebrew/install/HEAD/install.sh)"

# Add Homebrew to PATH
echo 'eval "$(/home/linuxbrew/.linuxbrew/bin/brew shellenv bash)"' >> ~/.bashrc
eval "$(/home/linuxbrew/.linuxbrew/bin/brew shellenv bash)"

# Check Homebrew
brew --version

# Install ngrok (Linux download)
wget https://bin.equinox.io/c/bNyj1mQVY4c/ngrok-v3-stable-linux-amd64.tgz
sudo tar xvzf ./ngrok-v3-stable-linux-amd64.tgz -C /usr/local/bin
ngrok version

# Connect ngrok to your account
ngrok config add-authtoken YOUR_AUTH_TOKEN

# Start the tunnel (keep this terminal open)
ngrok http 5678
Setup A: Docker Desktop (run in PowerShell):
docker stop n8n
docker rm n8n
docker run -d --name n8n -p 5678:5678 -v n8n_data:/home/node/.n8n -e WEBHOOK_URL="https://YOUR-NGROK-URL.ngrok-free.app/" -e N8N_HOST="YOUR-NGROK-URL.ngrok-free.app" -e N8N_PROTOCOL="https" -e N8N_PROXY_HOPS=1 --restart unless-stopped docker.n8n.io/n8nio/n8n
docker exec n8n printenv WEBHOOK_URL
Setup B: n8n inside WSL (second WSL terminal):
export WEBHOOK_URL="https://YOUR-NGROK-URL.ngrok-free.app/"
export N8N_HOST="YOUR-NGROK-URL.ngrok-free.app"
export N8N_PROTOCOL="https"
export N8N_PROXY_HOPS=1
n8n start
Conclusion
Local n8n plus ngrok is one of the best ways to start learning workflow automation. You do not need to buy a domain, rent a server, or enter a credit card. One tunnel lets your automations receive events from almost any online service.
The hardest part of this setup is not the technology. It is using the right terminal and giving n8n the right settings. With Docker, remember that settings are applied when the container is created. With WSL, remember that settings are applied when n8n starts. Once you understand that, everything else is easy.
Here is a good next step. Use a Telegram bot to trigger an n8n workflow that sends a message to your phone. That moment, when your own laptop reacts to a message from the outside world, is the best reward this setup gives you.
Happy automating!
Also check:
How to Build an AI Research Workflow Using ChatGPT and NotebookLM (2026)